Step by-Step Guide on How To Start a Blog in 2023 – DigitalEmpire
November 9, 2023How to make blog on google, how to start your blog, how to start a blog in 2023 step by step, free blog kaise banaye 2023, Step by-Step Guide on How To Start a Blog in 2023
Are you thinking of starting a blog? If you’re interested in learning how to create a blog, this post will be very beneficial to you. I am going to give you information about How to start a blog in 2023 and you can also earn money from your blog.
It’s not as challenging as some people make it out to be. The blogging industry is enormous, and the number of bloggers is rising daily. This subject is excellent for you if you have writing talent and fantastic thoughts that you want to spread to more people.
Through blogging, which can potentially change your life, you can also make money by communicating with people about your ideas.
You can learn to start a blog in 30 minutes if you read this post carefully and follow all the instructions. I’ve laid out a step-by-step process to start a blog. However, if you accidentally omit any of the steps, launching a blog may become difficult.
That’s why I would say that after reading this article thoroughly, understanding all the steps and then follow it, then you can start a blog very easily.
[ez-toc]
Step by Step Process How To Start a Blog in 2023
To start a blog, you have to follow some steps, here I have given step by step process for start a blog, with the help of which you can start a blog easily.
Step 1. Motivation
The first step of Start a Blog is Motivation, which means that what is your purpose to start blogging, you should know that if you have not decided the purpose for your website, then there is no point in blogging.
Each and every blogger has a goal in mind for the blog they are writing for. Therefore, you must choose your motivation for blogging before entering the sector.
Your goal should be whether you want to write for a living or just as a passion, whether you want to turn your website into a business in the future, and whether you want to sell it when a certain period of time has passed.
In this way, you should also set a goal before starting a blog so that you can make your website successful.
Let me explain it to you through an example like; Take Amazon itself, in today’s time Amazon has become a brand that people search for its name on the search engine and visit that website directly. The Amazon website might not have grown to be such a significant online retailer in the present day if its owner had operated it without any goals.
His aim was to brand his website. You must now see how crucial it is to choose a purpose before beginning a blog. If you understand this step, then let me tell you about Next Step Niche.
Step 2. Niche Selection
After you have chosen your blogging goal, the next step is to choose a niche. When starting a blog, you must also choose the market that the website will serve. What subject will be covered by the blog posts that will be posted there?
You should choose such a niche for the website in which you are interested and you should also have good knowledge about that niche so that you can prepare a good blog post. You should also keep in mind that the niche that you have selected for the website, you should publish related blog posts from the same niche.
Additionally, these niches can be divided into two categories: Micro and Without Niche. Many people do blogging without Niche, the website of such bloggers is not able to rank on the search engine because they keep publishing content related to different topics on the website, Thus, there is a significant reduction in the website’s chances of ranking.
Similar to this, people who start a blog by selecting a micro niche and write blog entries relevant to the website’s niche quickly succeed by ranking their websites on search engine result pages (SERPs). Google also suggests picking a Micro Niche.
Because in this a small part of a big topic has to be selected and content has to be prepared in detail on it. If you are a Beginner Blogger, then it is better for you to choose Micro Niche, you can write articles on such topics on which the competition is low and you can easily get your website ranked high on Search Engine. So now you must have understood how important it is to choose Niche.
Must Read: How To Improve the Page Speed Of website – Simple Steps
Step 3. How to get Hosting and Domain
Now that you have learned well about the purpose and niche of Start a Blog, now I will tell you how to get hosting and domain for the website. The process of taking hosting and domain is completed simultaneously because all web hosting providers also provide website domain.
By the way, you can get hosting from any hosting provider website thanks to the Internet’s abundance of web hosting provider websites. However, given I also use Hostinger, I would suggest you to purchase hosting from them.
Because Hostinger is a reasonably priced and reliable web host, it is preferable for you to choose them if you are just starting out as a blogger. Let me explain the procedure. which is similar to this.
- First of all goto hostinger website.
- When you come to the Hostinger website, there you will get the option of Menu in 3 Lines type, if you are a Beginner Blogger then it is better for you to take Shared Web Hosting.
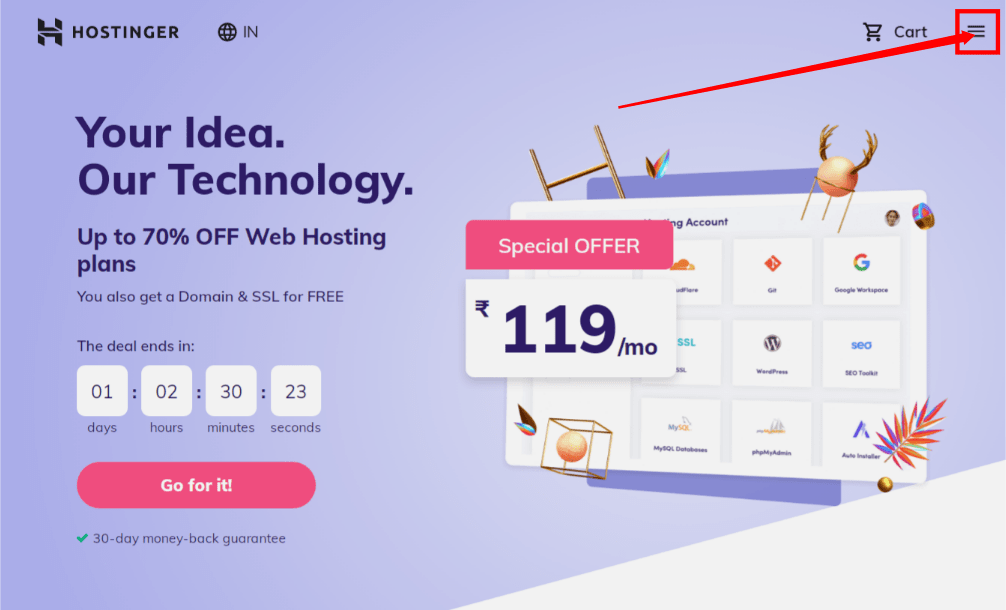
- For this you first click on Menu.
- Then some options will come in front of you, from which you click on Hosting.

- As soon as you click on Hosting, you will get to see some types of Hosting, out of which you have to select Shared Web Hosting.
- After selecting Shared Web Hosting, you have to scroll down to the page where you will see 3 Web Hosting Plans. In which the first is Single Web Hosting, the second is Premium Web Hosting and the third is Business Web Hosting.
- If you are a Beginner Blogger, then Single Web Hosting or Premium Web Hosting Plan will be better for you. You can select any of the two.
As soon as you do Add to Cart, a new page will open in front of you where you will get to see offers according to the plan of some months, on which there will also be a discount. You can select any offer according to you.
After this, you will get the option of Daily Backup below here, if you want to take Daily Backup to protect your website, then you can select this option, for this also Charge Pay has to be paid.
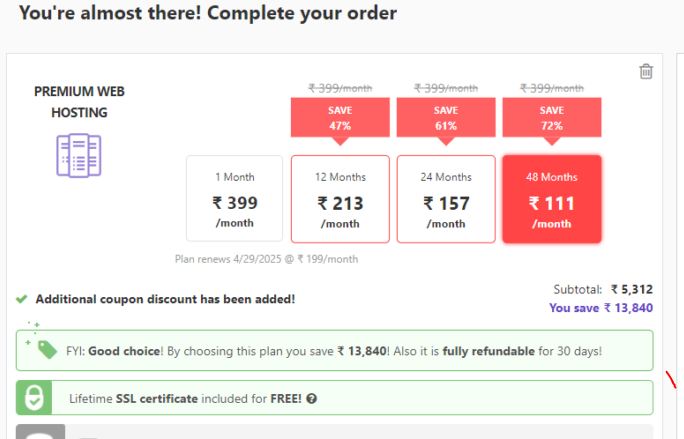
- Here you also get an option of Cloudflare Protection, you can enable it to protect your website. For this also you have to pay Charge, this facility is available for Lifetime.
- After this you will get the option of Domain. In this search bar, you have to do a domain search for your website. The domain you have set for your website, you can search here and see whether it is available or not.
- If the domain you searched will be available then it gets added to your order summary.
After this, in the Order Summary, you can see that the total amount of all the features including Amount and Taxes is total. After that you can continue the further process by clicking on Checkout Now.
After clicking on Check Out Now, a page will open in front of you where you will have to create an account. Here you will be asked some details which you can submit and pay.
In this way you can easily purchase Hosting and Domain. Now let me tell you about the next step.
Step 4. How to do Infographic Design
Infographic Design is the next stage of setting up a blog. When domain and hosting are purchased, this step is completed. The domain provides the website with an address. But you should also create a logo for the website if you want to later establish it as a brand.
Branding the website gives you many benefits, people visit your website directly by searching your website’s name on the search engine, which leads to a traffic increase on your website and on your website top in Search Engine Result Pages (SERPs). Ranking starts.
It is very important to create a good logo so that the website can get a different identity and banners can also be designed to add to your website related to any of your products or related to any other business and much more. Let me explain you by giving an example so that you can understand easily.
It is crucial to design a nice logo so that the website can acquire a distinctive identity. You can also design banners to add to your website that are relevant to any of your items or that are related to any other business, among other things. In order for you to comprehend, allow me to provide an illustration.
Today, there are a lot of well-known websites and businesses that have established themselves as brands. People can recognise these businesses by glancing at their logos, for example, even young children can recognise the Apple Corporation by its emblem.
Analyze Amazon’s website to see how it has developed into a brand. You must now realise how crucial the logo is to building the brand of the website. However, the website’s logo should be created in such a way that visitors can only recall your website’s name after seeing it. A logo should be both original and straightforward.
Step 5. How to Install WordPress
Installing WordPress is required once you have acquired hosting and a domain name, so allow me to walk you through the procedure. You risk having issues installing WordPress if you accidentally miss any steps in this process. So let’s break down this procedure using a few examples: First, go to Hostinger’s Dashboard and click on Manage in Hosting.

- You may access the Hosting Control Panel and all of its features by clicking on Manage.
You will see the option for the Auto Installer when you scroll down this page; select it.
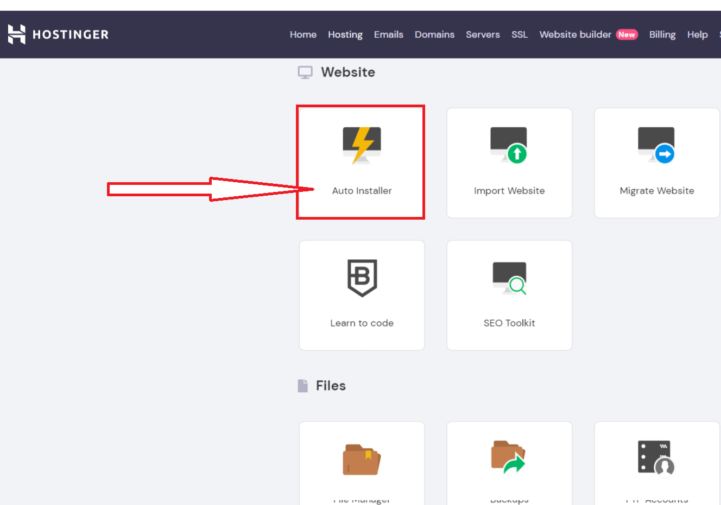
When you click Auto Installer, a new page will load with WordPress, WooCommerce, Joomla, and other alternatives. You must choose WordPress from this list.
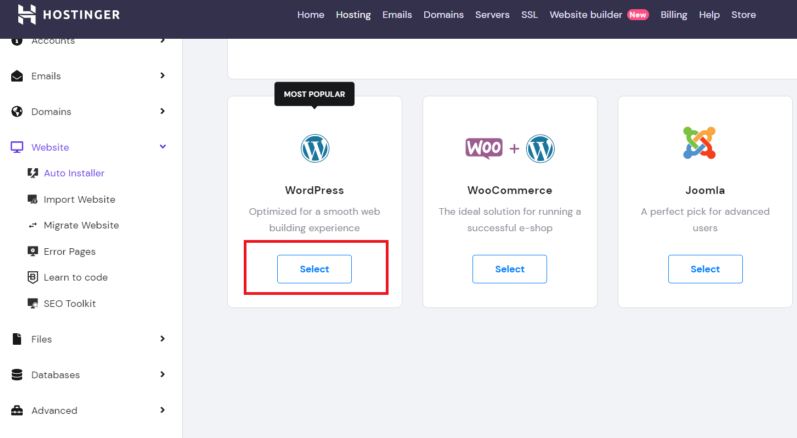
- As soon as you make your choice, a page with various installation-related settings will appear in front of you.
- You must include a description of your website in the Description Option.
- The next step is to choose between http and https in the second choice; you choose https because it is secure.

- The name of your website, which is also known as the domain name, must then be written.
- After that, you must create a password and enter the Administrator username in order to log into your WordPress website.
- The administrator email must then be typed, and the website title must be entered in the Website Title option.
Following that, there is a drop-down menu where you may choose the language in which you want to blog. - By selecting Install when you’ve finished setting everything up, WordPress can be set up quickly.
Step 6. How to do WordPress Settings
Before using WordPress after the installation is complete, there are a few key settings that need to be made. I’ll go through those points in more detail below.
These settings need to be carefully studied because if one is off, issues may arise later. I’ll describe these options now.
- When WordPress is opened, its Dashboard contains a number of options, including one for Settings. Click that option to access more.
- You will be presented with a number of configuration options as soon as you click on Settings; you should choose Permalinks as your initial choice.
Following your selection of Permalinks, the Permalinks settings screen will appear. Here, you have the choice of Common Setting, where you must specify the URL structure for your website. You choose whatever suits your tastes.
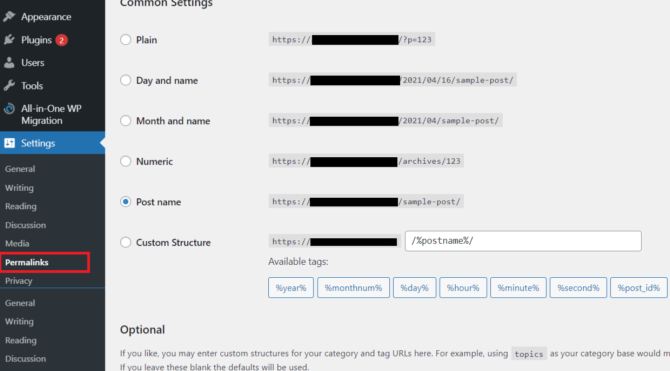
- When picking the URL structure, keep in mind that the URL should be brief and straightforward because Google values such URL structures more and the post name should be included in them. You can pick whoever suits you best, of course.
- Click Save Changes after selecting URL Structure.
You must select the General option under Settings to complete General Settings after establishing the permalink. You are presented with the opportunity to perform General Settings after clicking.
- The first option in this is Site Title, in this you have to write the title of your website.
- After this there is an option to write Tagline.
- Then you have to add the Administration Email Address.
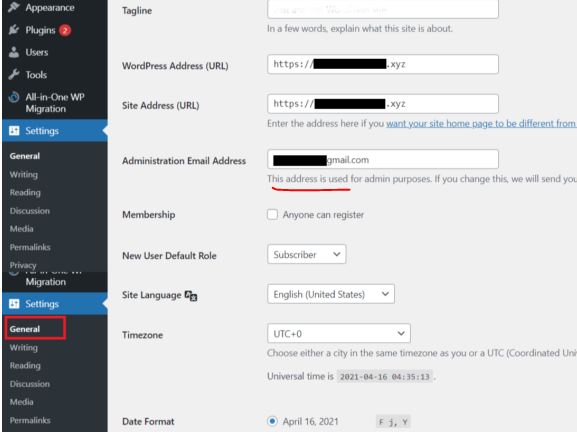
- You can choose the appropriate language for your website here using the Site Language option.
- Following that, you have the opportunity to choose a time zone, where you can do so based on your nation.
- You can then choose the date format that best suits you using this option, which is called Date Format.
- Time Format is also available here, and you can choose it as needed.
- You can choose any day for your website’s first week of operation using the Week Start On option, which is located below this. After completing this setting, click Save Changes to save it.
Apart from these settings, there are many other settings which you can change according to your convenience. Let me now tell you the next step.
Step 7. How to Install Theme
After making your WordPress settings, you must choose a theme because doing so makes your website more appealing, which benefits visitors. All bloggers use themes on their websites. Good experience.
Let me tell you about installing the theme. You have to follow some points to install the theme in your website. which are as follows;
- You must first visit your WordPress Dashboard.
- Click on the Appearance option that is presented to you here.
- When you select Appearance, the Themes page will appear in front of you.

- Click on the Add New option that is available here.
- You can install any theme you choose after selecting the Add New option from the list of available themes.
- Here, it’s important to keep in mind that you should only install generatepress on your website because these themes are lightweight and help AMP run properly.
- In addition to this, there are many excellent themes on the Internet that you can download and upload to your WordPress website.
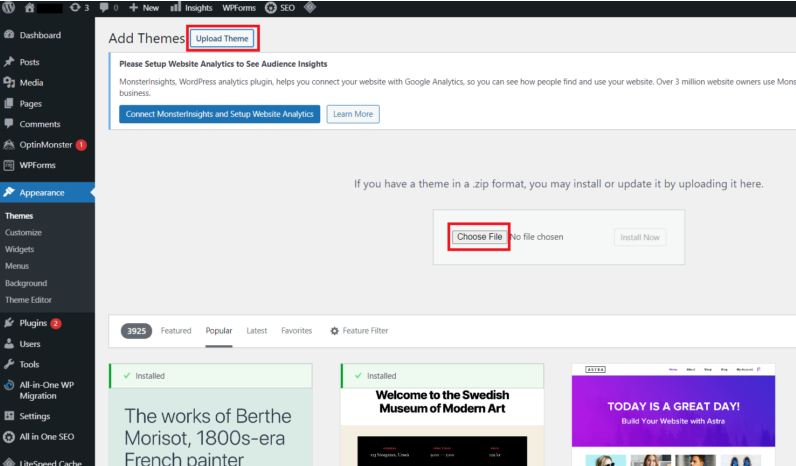
When you click Add New, the option to Upload Theme above will appear; select it.
Step 8. Important Plugin to Install
1. Yoast SEO or Rank Math
Yoast is a plugin that analyses your blog post and provides you with a report that tells you whether it is SEO friendly or not. You can also use it to optimise blog posts. Rank math is another option, and it’s what most people use nowadays.
2. Akismet Anti Spam
It prevents Spam Comments coming on your Blog Post.
3. SiteKit
Site Kit is Google’s official WordPress plugin—it gives you insights on how people find and use your site, how to improve and monetize your content, with data from multiple Google tools.
4. Short Pixel Image Optimizer
If you add images to your blog post, then you can use this plugin. Lightweight is made by optimizing the image so that the loading speed of the website can be fast.
Step 9. Create Important Pages
Here is list of pages you need to create
About us
Contact us
Disclaimer, Privacy Policy Page
Terms and Service Page
Step 10. Write Blog Post and Optimize SEO
So let me tell you about writing a blog post, how you can write a blog post;
- To begin, go to the WordPress website’s Dashboard and select the “Post here” option from the menu that appears.
- Click on the Add New option that is available here.
- After you click, a new page will load with the ability to add a title at the top. You must enter the title of the blog post you will be writing here.
- Following this, you will have the choice of starting to write your blog post by clicking Start Writing or Type / To Choose a Block under the title.
- Along with this, you can add many things like Images, Table etc. to your blog post.
When you prepare a blog post by writing, you also have to do On Page SEO Optimization of that blog post before publishing it. Here below I have given information about SEO Optimize Blog Post through some points. which is like this ;
- Before producing a blog post, conduct keyword research.
- Improve the photographs that were included in the blog post.
- Make the blog post’s title more effective by including the focus keyword in it.
- Improve your meta description.
- Make your blog post’s URL SEO-friendly.
- Make Visitors-Friendly Content Available.
Must Read: How To Improve the Page Speed Of website – Simple Steps
If you have found this article helpful to me, then you must share it to the needy people and if you have not understood any step, then you can comment.